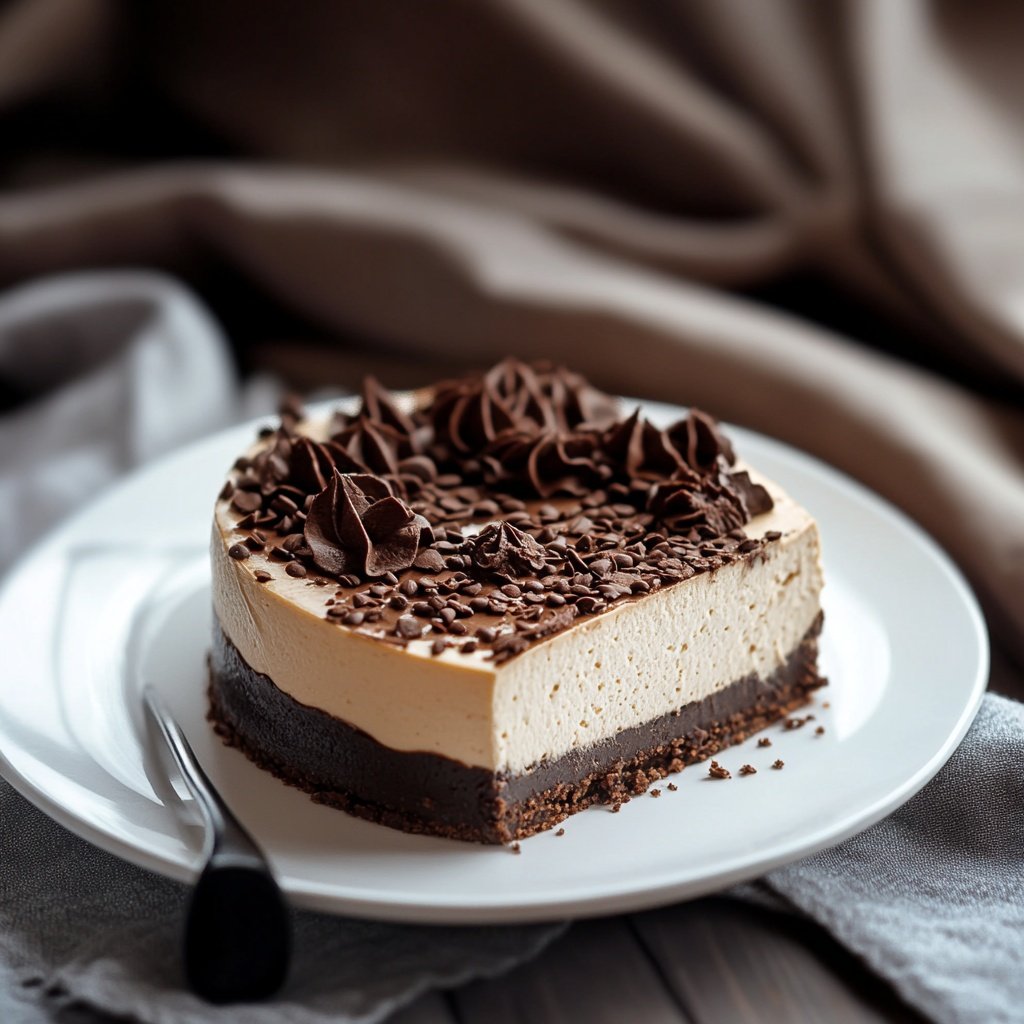
Cappuccino Fudge Cheesecake Recipe

Few desserts satisfy like a cappuccino fudge cheesecake—a luxurious blend of deep chocolate, creamy cheesecake, and bold espresso notes.
This recipe goes beyond ordinary cheesecake by pairing a chocolate wafer crust and rich chocolate ganache with a luscious, coffee-infused filling.
Whether you’re planning a dinner party centerpiece or treating yourself, you’ll find pro techniques, troubleshooting tips, and creative finishing touches to make this cheesecake both stunning and unforgettable.
Ingredients Checklist
Gathering the right ingredients and equipment is the first step to success. Here’s everything you’ll need for this showstopping cheesecake.
Start with this essential checklist and a brief description of each component:
-
Crust:
-
1 (9-ounce) box chocolate wafer cookies, finely crushed
Provides a crisp, flavorful base that pairs beautifully with cheesecake. -
1/2 cup (1 stick, 113g) unsalted butter, melted
Binds crumbs for a sturdy, sliceable crust.
-
-
Ganache Layer:
-
1 1/2 cups (360ml) heavy whipping cream
For a silky, decadent ganache. -
1 1/4 pounds (567g) bittersweet or semisweet chocolate, finely chopped
Quality chocolate is key for balanced flavor and smooth texture. -
1/4 cup (60ml) Kahlúa or other coffee liqueur
Deepens coffee flavor—can substitute with strong brewed coffee if needed.
-
-
Cheesecake Filling:
-
32 ounces (4 blocks, 900g) cream cheese, at room temperature (regular or low-fat)
Room temperature prevents lumps and ensures a smooth batter. -
1 1/3 cups (265g) granulated sugar
For sweetness and structure. -
2 tablespoons (15g) all-purpose flour
Stabilizes the filling for perfect slicing. -
3 tablespoons (20g) instant espresso powder
Brings bold cappuccino flavor without adding liquid. -
1 tablespoon vanilla extract
Rounds out all the flavors. -
2 teaspoons light molasses or dark corn syrup
Adds depth and enhances color (optional but recommended). -
4 large eggs, at room temperature
Ensures even texture and prevents overbeating.
-

-
Optional Garnishes:
-
Chocolate-covered espresso beans
For extra flair and crunch. -
Whipped cream
Balances the richness with a light finish.
-
-
Equipment:
-
9-inch springform pan (with tight-fitting base)
-
Food processor (for crust)
-
Stand mixer or electric hand mixer
-
Mixing bowls, spatulas, measuring cups and spoons
-
Pastry bag and large star tip (for decorative ganache)
-
Rimmed baking sheet (to catch any drips)
-
Parchment paper and foil (for easy removal and water bath, if desired)
-
Step-by-Step Instructions
Carefully following each step ensures your cheesecake turns out smooth, creamy, and impressive every time.
Here’s a detailed walkthrough to guide your process:
-
Prepare the Crust:
-
Preheat oven to 350°F (175°C). Grease or line the bottom of a 9-inch springform pan with parchment.
-
In a food processor, pulse the chocolate wafer cookies into fine crumbs. Add melted butter and blend until mixture resembles wet sand.
-
Press crumbs evenly into the bottom and 1 inch up the sides of the pan. Use a flat-bottomed glass for an even press.
-
Bake for 8 minutes. Set aside to cool completely.
-

-
Make the Ganache:
-
In a saucepan, heat cream until just simmering—do not boil.
-
Remove from heat and add chopped chocolate. Let sit 2 minutes, then whisk until smooth.
-
Stir in Kahlúa or coffee liqueur (or substitute strong coffee).
-
Pour about 2 cups of ganache over the cooled crust. Tilt to spread evenly.
-
Freeze pan for 30 minutes, until ganache is firm. Reserve leftover ganache in an airtight container in the fridge.
-
-
Prepare the Filling:
-
Using a mixer, beat cream cheese until perfectly smooth (3–4 minutes). Scrape bowl often to avoid lumps.
-
Add sugar and beat 2 minutes more.
-
Beat in flour, instant espresso, vanilla, and molasses.
-
Add eggs one at a time, beating just until each is incorporated. Do not overmix after eggs are added to avoid a dense texture or cracks.
-
Pour filling over chilled ganache layer and smooth the top.
-
-
Bake the Cheesecake:
-
Optional: For a silkier texture and less risk of cracking, wrap the outside of the springform pan with foil and place in a water bath.
-
Place pan on a rimmed baking sheet and bake at 350°F (175°C) for about 60–70 minutes, until edges are puffed and set but the center wobbles slightly.
-
Turn off the oven, crack the oven door, and let the cheesecake cool inside for 1 hour (this helps prevent cracks).
-
Remove to a wire rack and cool completely at room temperature (about 2–3 hours), then refrigerate at least 6 hours or overnight.
-
-
Finish and Decorate:
-
Before serving, use a knife to loosen the cake from the pan sides, then remove the springform ring.
-
Let reserved ganache soften at room temperature or gently re-whip with a mixer until spreadable and lightened in color.
-
Pipe or dollop ganache around the cheesecake edge using a pastry bag fitted with a large star tip.
-
Garnish with chocolate-covered espresso beans and whipped cream as desired.
-
Tips for Perfect Results
Small changes and expert knowledge make all the difference in cheesecake perfection.
-
Room Temperature Ingredients: Always use room-temperature cream cheese and eggs to avoid lumps.
-
Don’t Overbeat: Overmixing after adding eggs introduces air, which can lead to cracks.
-
Water Bath Option: While not required, a water bath helps prevent cracking and gives an ultra-smooth texture.
-
Check Doneness: The edges should be set and the center should jiggle slightly—residual heat will finish the baking.
-
Chill Thoroughly: Cheesecake needs time to set and develop flavor—overnight chilling is best.
-
Cutting Clean Slices: Use a sharp knife dipped in hot water and wiped dry between cuts for bakery-perfect slices.
Serving Suggestions
Presentation turns this cheesecake into a true showstopper.
-
Serve each slice drizzled with extra warmed ganache or espresso fudge sauce.
-
Add a dollop of freshly whipped cream and a chocolate-covered espresso bean on each plate.
-
Pair with hot espresso, cappuccino, or coffee liqueur for a perfectly matched dessert course.
-
For a festive touch, sprinkle with cocoa powder, shaved chocolate, or a pinch of cinnamon.
Final Thoughts
Cappuccino fudge cheesecake is a masterpiece of flavor and texture—an impressive dessert for holidays, celebrations, or any time you want to wow a crowd. With a crisp chocolate crust, smooth ganache, and bold espresso cheesecake filling, each bite delivers satisfaction. Plan ahead for chilling, don’t rush the process, and enjoy the aroma as it bakes. This recipe rewards care and attention with unforgettable results.
Storage: Keep cheesecake covered and refrigerated up to 5 days. For longer storage, freeze (undecorated) in a double layer of plastic wrap and foil for up to 2 months—thaw overnight in the fridge before serving.
Make-Ahead: This dessert is ideal for advance prep. Both crust and ganache can be made a day ahead; baked cheesecake improves in flavor and texture with an overnight chill.
Upgrade: Try swirling some ganache through the batter before baking for dramatic presentation, or add a dash of cinnamon or nutmeg to the filling for a spiced twist.
With these techniques and tips, your cappuccino fudge cheesecake will always be the highlight of any dessert table. Enjoy every slice!

Sabrina Khan Tisha is the creative force behind Dessert Diary, a recipe blog celebrating desserts, cakes, cupcakes, muffins, and sweet treats. With a passion for baking, she shares simple, delicious recipes and tips to inspire home bakers everywhere.