Delicious Devil’s Food Cake Recipe
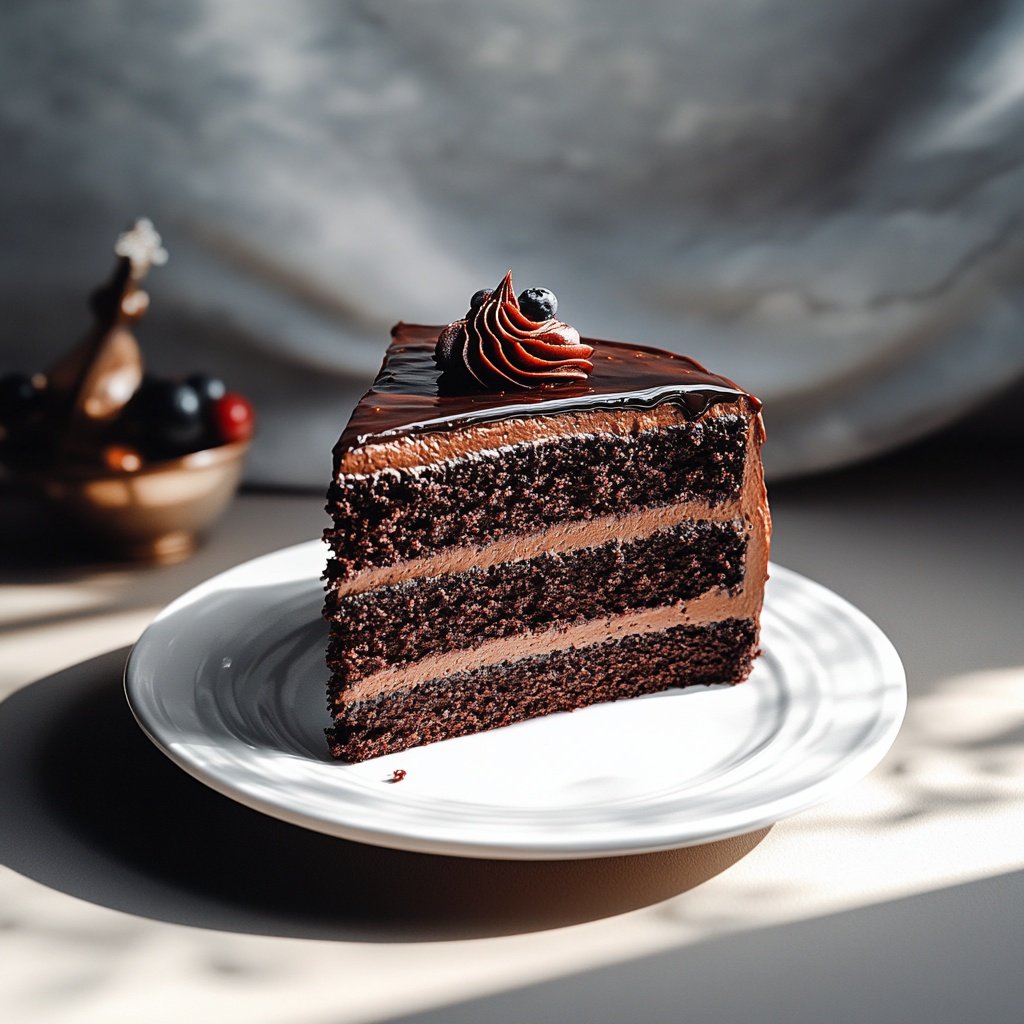
Devil’s Food Cake is the ultimate chocolate cake—intensely rich, ultra-moist, and shrouded in luscious chocolate frosting. Its legacy dates back to the early 1900s, prized for its deep cocoa flavor and irresistible tenderness.
This recipe, adapted from a cherished family tradition, captures that decadent nostalgia in every bite. Whether you make it as a layer cake or cupcakes, it’s a showstopper for birthdays, holidays, or any moment that calls for pure chocolate indulgence.
With step-by-step instructions and expert baking tips, you’ll easily create a cake that rivals any bakery.
Ingredients Checklist
Quality ingredients are the secret to the best Devil’s Food Cake. Here’s what you’ll need, plus substitutions and optional add-ins for even more chocolate bliss.
For the Cake
-
2 cups (250g) all-purpose flour
-
3/4 cup (65g) Dutch-processed cocoa powder (for rich flavor and color)
-
2 cups (400g) granulated sugar
-
1/2 cup (100g) packed brown sugar (for moisture and a caramel note)
-
1 1/2 teaspoons baking soda
-
1 1/2 teaspoons baking powder
-
1 teaspoon fine salt
-
1/2 cup (113g) unsalted butter, at room temperature
-
1/2 cup (120ml) neutral oil (vegetable, canola, or melted coconut oil)
-
3 large eggs, at room temperature
-
2 teaspoons pure vanilla extract
-
1/2 cup (120g) sour cream or full-fat plain yogurt
-
1 cup (240ml) whole milk, at room temperature
-
1 cup (240ml) hot coffee (or hot water with 1 tsp espresso powder, for a deeper chocolate flavor)

For the Chocolate Fudge Frosting
-
1 cup (240ml) heavy whipping cream
-
12 oz (340g) bittersweet or semisweet chocolate, coarsely chopped
-
3/4 cup (170g) unsalted butter, at room temperature
-
2 cups (240g) powdered sugar, sifted
-
1 teaspoon vanilla extract
-
3/4 teaspoon espresso powder (optional, for depth)
-
1/8 teaspoon kosher salt
Optional Add-Ins and Garnishes
-
1 cup mini chocolate chips or chocolate shavings for the batter or garnish
-
Toasted nuts, berries, or edible gold leaf for an elegant finish
Step-by-Step Instructions
This method yields moist, tall cake layers that slice beautifully and stay fresh for days.
1. Prep and Pan Preparation
-
Preheat your oven to 350°F (175°C).
-
Grease and flour three 8-inch or two 9-inch round cake pans. Line the bottoms with parchment for easy release.
2. Mix Dry Ingredients
-
In a medium bowl, sift together the flour, cocoa powder, baking soda, baking powder, and salt.
3. Cream Butter, Oil, and Sugars
-
In a large bowl or stand mixer, cream the butter, oil, granulated sugar, and brown sugar until light and fluffy (about 3–4 minutes on medium speed).
-
Beat in the eggs, one at a time, then add the vanilla.
4. Add Sour Cream and Mix
-
Blend in the sour cream until smooth and creamy.
5. Alternate Dry and Wet Ingredients
-
Add one-third of the dry ingredients to the batter, mixing on low.
-
Add half the milk and mix until just combined.
-
Repeat, alternating dry and wet ingredients, ending with the final portion of dry ingredients. Mix until just combined.
6. Add Hot Coffee
-
With the mixer on low, slowly stream in the hot coffee. The batter will be thin—this ensures a moist crumb.
7. Bake
-
Divide the batter evenly among pans.
-
Bake for 28–33 minutes, or until a toothpick inserted into the center comes out with moist crumbs (not wet batter).
-
Cool the cakes in the pans for 10 minutes, then turn out onto a wire rack to cool completely.
8. Make the Fudge Frosting
-
Heat the cream in a saucepan until just simmering.
-
Pour over the chopped chocolate and let sit 2 minutes. Stir until smooth.
-
Beat in the softened butter, then add powdered sugar, vanilla, espresso powder, and salt. Beat until glossy and fluffy.
-
If the frosting is too soft, chill for 15–20 minutes, then whip again for a spreadable consistency.

Tips for Perfect Results
-
Use Dutch-Processed Cocoa: For the signature deep color and rich chocolate taste.
-
Don’t Overmix: Blend ingredients until just combined for a tender crumb.
-
Room Temperature Ingredients: Prevents curdling and ensures even rise.
-
Check Early: Start testing cakes 5 minutes before the earliest recommended time.
-
Level Your Layers: For a professional look, trim domed tops with a serrated knife.
-
Crumb Coat: Spread a thin layer of frosting to trap crumbs, chill, then finish with a thicker coat.
-
For Extra Moisture: Brush cake layers with a simple syrup (sugar dissolved in hot water) before assembling.
Serving Suggestions
Devil’s Food Cake is stunning on its own, but here are some creative serving ideas:
-
Add a sprinkle of flaky sea salt or chocolate curls for a gourmet finish.
-
Serve with fresh raspberries, strawberries, or cherries to cut the richness.
-
Pair each slice with a scoop of vanilla or coffee ice cream.
-
Add a swirl of whipped cream or a drizzle of salted caramel sauce.
-
For celebrations, top with edible flowers or gold dust for visual flair.

Storage and Make-Ahead Tips
-
Room Temperature: Store the frosted cake in an airtight container for up to 2 days.
-
Refrigeration: For longer storage, refrigerate for up to 5 days. Let slices come to room temp before serving for the best texture.
-
Freezing: Wrap unfrosted cake layers tightly in plastic and foil. Freeze for up to 2 months; thaw in the fridge before frosting.
-
Cupcake Version: Fill lined muffin tins 2/3 full, bake at 350°F (175°C) for 18–22 minutes.
Variations
-
Gluten-Free: Substitute a 1:1 gluten-free flour blend.
-
Vegan: Use plant-based butter, dairy-free yogurt, and non-dairy milk. Swap eggs with flax eggs (1 tbsp ground flaxseed + 2.5 tbsp water per egg, rested 5 min).
-
Spiced: Add a pinch of cinnamon or chili powder for a Mexican chocolate twist.
-
Orange Chocolate: Add 1 tablespoon grated orange zest to the batter for citrus fragrance.
Final Thoughts
Devil’s Food Cake is the ultimate chocolate dessert—rich, moist, and layered with a glossy, irresistible fudge frosting. This recipe is easy to master, endlessly adaptable, and guaranteed to impress. Whether you’re honoring a family tradition or starting your own, each slice brings the perfect balance of nostalgia and decadence to any table. Enjoy baking, sharing, and indulging in this timeless treat!

Sabrina Khan Tisha is the creative force behind Dessert Diary, a recipe blog celebrating desserts, cakes, cupcakes, muffins, and sweet treats. With a passion for baking, she shares simple, delicious recipes and tips to inspire home bakers everywhere.